
Updated on May 3, 2024
Completing the Supplier Detail Window - W-9 and Remittance Address in Prendio
Completing the Supplier Detail Window - No W-9 or Remittance Address
Sending the PO to the Requester
Reviewing a Requestor Order
A Requestor order is a PO that the user wishes to deliver to the supplier directly. When users create a cart, I will place the order is selected as the Order Type:
![]()
If the user must selects a Connected supplier indicated by the checkmark with a circle, Prendio automatically generates a PO number and a PDF copy of the PO is emailed to the user. It will be their responsibility to submit the PO and communicate with the supplier an ETA for the order:
![]()
When a user selects a supplier that is not connected (no checkmark with a circle to the left) or new to Prendio (does not appear in the Supplier field when searching), the requisition comes to the Requisition Queue in the Buyer role to process.
To process a Requestor order in Prendio, start by navigating to the Requisition Queue found in the Buyers’ Queue (all Requestor orders in the Requisition Queue appear in pink as they are new suppliers):

Once in the Requisition Queue, you will be able to sort the requisitions by order Type. After locating a Requestor order, process the order by clicking on Own in the Actions column:

Completing the Supplier Detail Window - W-9 and Remittance Address in Prendio
After ownership has been taken for the order, the Supplier Detail window appears as a new supplier is used for the order. Behind the Supplier Detail window are the PO details and a PO number is assigned:

On the Supplier Detail window, check that the remittance address and W-9 are listed for the supplier:

If the remittance address and W-9 are not provided for the supplier, please reach out to the supplier to obtain this information. After the remittance address and W-9 have been obtained, complete the remittance address details and attach the W-9 .
Once it is confirmed that the remittance address and W-9 are listed for the supplier, Connect the supplier to the left of the Supplier Detail window by checking off Connected (Account Established). Active Account (Items Available for Orders) should already be checked off:

If items and services are tax exempt, please also select Items/Services are Tax-Exempt:

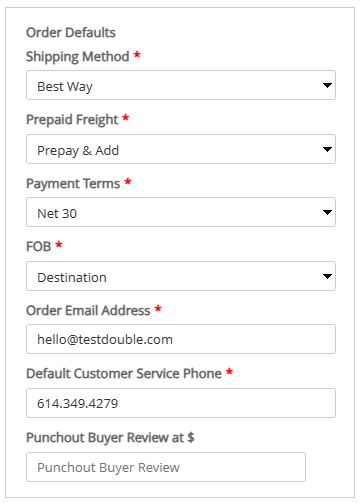
Fill in the Order Defaults (these may be changed later if needed):
Once complete, Save on the bottom right and exit out of the Supplier Detail window:
![]()
Once the Supplier Detail window is closed, the details of the PO will appear:

Please note that the Supplier Detail window must be completed before a PO can be generated. If a user exits out of the Supplier Detail window, the user will be unable to generate a PDF copy of the PO and areas are blank (example below):

The PO can now be sent to the Requester. Please skip to Sending the PO to the Requester of this document for further instructions.
Completing the Supplier Detail Window - No W-9 or Remittance Address
There may be times when a new supplier does not have a remittance address or W-9 in the Supplier Detail window:


The supplier above does not have a remittance address or W-9 uploaded. Before Connecting this supplier to your company, you must reach out to the supplier and obtain this information. Users can exit of the Supplier Detail window and navigate out of the PO page, by selecting Dashboard or Buyer until the supplier provides this information:
![]()
Once the remittance address and W-9 have been obtained, locate the PO in the My Reqs tab of the Buyer role:

Select View (eyeball) in the Actions column:

The Supplier Detail window for the PO appears. Add the remittance address to the Supplier Detail Window (Please note that the first line of the address is for the supplier's name):

Attach the W-9:

Complete the supplier's FID and Tax Classification (these fields can be found on the supplier's W-9):

After the W-9 is attached and the supplier's tax information is complete, mark the supplier as Connected (Account Established). Active Account (Items Available for Orders) should already be checked:
If items and services are tax exempt, please also select Items/Services are Tax-Exempt:
Fill in the Order Defaults (these may be changed later if needed):

Once complete, Save on the bottom right and exit out of the Supplier Detail window:
![]()
Once the Supplier Detail window is closed, the details of the PO will appear:
Please note that the Supplier Detail window must be completed before a PO can be generated. If a user exits out of the Supplier Detail window, the user will be unable to generate a PDF copy of the PO and areas are blank (example below):

The PO can now be sent to the Requester. Please navigate to the next section of this document Sending the PO to the Requester for further instructions.
Sending the PO to the Requester
Review the PO to see if any adjustments need to be made. Email the user a PDF copy of the PO by selecting Email PO in the top right and select Requester:

A window appears with details of the email to be sent to the user. Click on Send on the bottom right. The order will be Marked as Confirmed once sent to the user:

After the PO is emailed to the user, a success message will appear at the top of the screeen:
![]()
The user is directed back to the Buyers’ Queue of the Buyer role:

The user receives an email with a PDF copy of the PO. The user must now place the order directly with the supplier:

The order will be marked as Confirmed with a Confirmed by Supplier status as it is the requester's responsibility to place the order:

Please note that when using a new supplier, the supplier may require that your company create an account with payment terms before they are able to process the order. This may involve filling out a credit application and performing a credit check.