
Prerequisites:
- This configuration requires that an SSO service, such as Microsoft Entra ID (formerly Azure AD), is available to your company. The company IT Department normally sets this up and provides the technical details. An overview of creating an Entra ID SSO application is available in this help doc.
- A Prendio user with the Admin role is required to complete this process
- If the SSO radio button is not available for an Admin to select, then the feature must be requested for the Company account. Contact Prendio Technical Support by completing a Support Ticket Request Form
An admin for Entra ID will need to create a SSO application that will be used for the authentication. That application will need the following fields and values:
| Identifier (Entity ID) | https://procure.prendio.com |
| Reply URL (Assertion Consumer Service URL) | https://procure.prendio.com/sso/Azure/auth |
| Sign on URL | (Leave empty) |
| Relay State | (Leave empty) |
| Logout URL | https://procure.prendio.com/sso/Azure/logout |
After the Entra ID configuration is complete, the Company Admin should first test the configuration by selecting SSO for a different Prendio User. This way in the event of a mistake, the Admin is not locked out and the test user can be configured for Prendio Authentication while the issue is resolved.
Enabling SSO Integration for Your Prendio Company
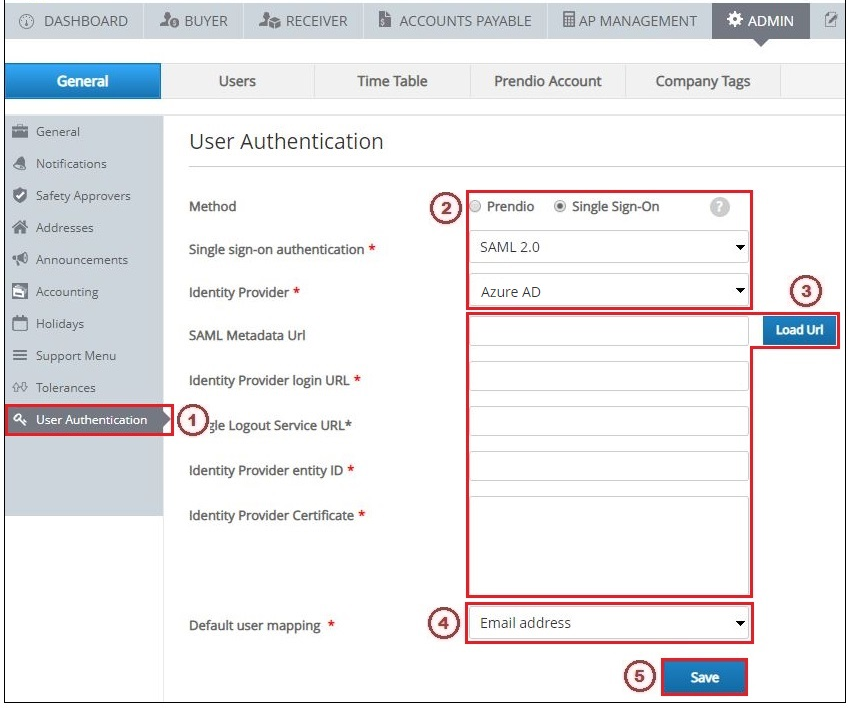
1. Go to [Admin > General] and click the User Authentication section
2. Select the Single Sign-On radio button, select "SAML 2.0" in the Single sign-on authentication field, and select "Entra ID / Azure AD" in the Identity Provider field
3. The Company IT and Prendio Admin then need to input the SAML Metadata URL in that field and click the Load URL button. After clicking that button, the Identity Provider Login Url, Identity Provider entity ID, and the Identity Provider Certificate fields will automatically populate.
4. "Email Address" is the Default User Mapping used with Prendio SSO.
5. Click the Save button.
Whenever the Save button is clicked on this page, a prompt appears asking how to proceed with the initial user configuration:
-png-Feb-10-2022-08-57-35-22-PM.png)
You can apply SSO authentication to all users or configure each user manually. See the next section for information on manually configuring authentication for each user.
Enabling SSO Authentication for a User-png-Feb-10-2022-08-57-37-79-PM.png)
6. Edit an account under [Admin > Users] and click the Authentication section
7. Select "SSO" in the Auth Metod field
8. Enter the user's email address in the IdP Username field. Note that the email address for this field is case sensitive depending on how Entra ID is configured
9. Click the Save button