
Prerequisites:
This requires the AP Management Prendio Role:

The Selected Actions menu hosts a variety of actions for an AP Push, as well as Managing Vouchers in this window:
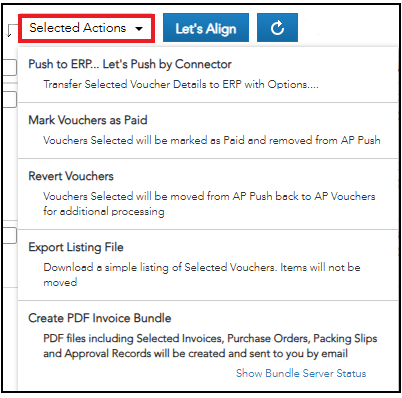
Note: For an action to be applied to any Vouchers, the Vouchers must be Checked prior to selecting that action:

Selecting Push to ERP... Let's Push by Connector will open the Let's Push window. This will Push the selected vouchers to the ERP System. During the Push three tasks take place, the System Checks for Duplicates, Updates Previously Pushed/Paid Bills, and of course, Pushes the Selected Vouchers:

Notes:
- See the information on Exporting a Listing File below. This action is recommended before conducting a Push.
- If ERP Integration is not enabled, Push to ERP... Let's Push by Export will display. With this method two .CSV files are created for manual import to an ERP System. For more details, please visit AP Push by Export
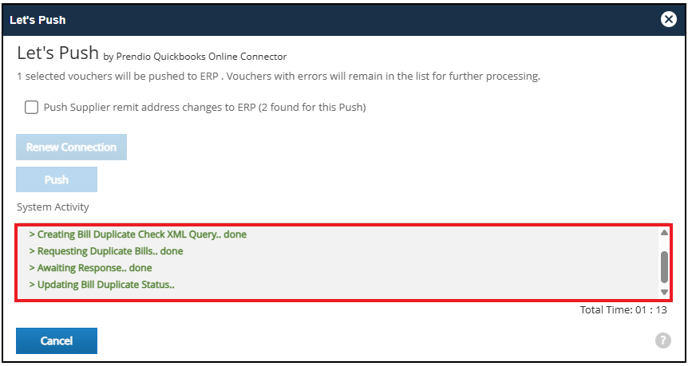
After the appropriate vouchers have been selected and Push to ERP... Let's Push by Connector is chosen from Selected Actions, the Let's Push window appears.
Prendio allows the user to push supplier remit address changes when this box is checked:

Users can select Push to enable Prendio to connect with the ERP system:

The progress displays in the System Activity field:
When the push is complete, the Let's Push window will automatically close. All of the vouchers successfully pushed and Last AP Push field was updated:
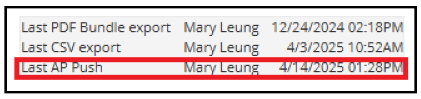
The pushed vouchers were move from the AP Push to Unpaid Bills:

Any vouchers that were pushed prior to this push, and paid through the ERP System or via Payments in Prendio prior to this push, were moved to the AP Management > Paid Bills window.
*Please note that if not integrated with an ERP System, users can Push by Export. For more details, please visit: AP Push by Export.
Mark Vouchers as Paid will not push the selected vouchers to the ERP System but will move them to the Paid Bills window. This feature can be used when you do not want to push a Voucher to your ERP System but want to remove it from the AP Management window:

Revert Vouchers will move the selected vouchers back to the Accounts Payable > Vouchers window. Use this action when an error is noticed on a Voucher but adjustments cannot be made on the AP Push screen:

Export Listing File will create a .CSV File that includes information on all of the selected vouchers. This is an excellent way to digitally record which vouchers were pushed at that time. This feature is strongly recommended before each Push.
Note: When this feature is requested, the Push cannot be conducted until the request is complete.

Create PDF Invoice Bundle will give the option of creating either a Purchase Order or Invoice Bundle with optional documentation as well.
Notes:
When this feature is requested, the Push cannot be conducted until the request is complete.
The user will be notified by email when the request is complete, or the Show Bundle Server Status link can be used to monitor the Status and Download the bundle when it is complete.

Watch a video demo of completing an AP Push