
Updated on July 22, 2026
After an application has been approved and configuration settings have been added via Payment Settings, users with the Payer role can process payments for the company via Unpaid Bills.
If interested in enabling Payments, please complete a Support Ticket Request Form
To view details regarding Application and bank account setup along with approval settings, please visit:
Payments - Application & Setup
Payments - Adding Approvers & Approval Policy Rules
Responding to a Payment Batch Approval
Responding to a Rejected Payment Batch
Funding From Payment Partner & Push to an ERP System
Status Labels in Batches & Payments Tabs
Creating a Payment Batch
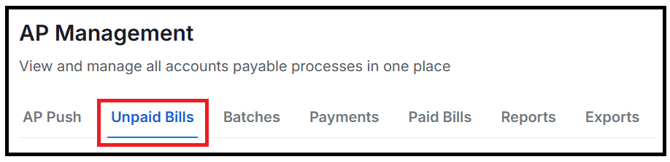
After a user with the AP Management role pushes a voucher to an ERP system, the voucher moves from the AP Push to Unpaid Bills. These invoices will also exist in the company’s ERP system. Users with the Payer role can create payment batches in Unpaid Bills.
Please note that users must have the Payer role in order to process payments.
Users can apply filters to search for specific vouchers and Apply after selection:
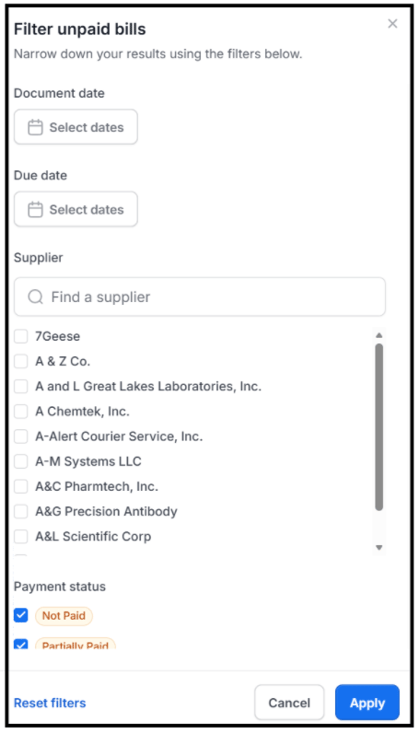
Tip: Use the Payment Status section and select Not Paid or Partially Paid vouchers. This will display vouchers that have yet to be submitted as a payment batch:
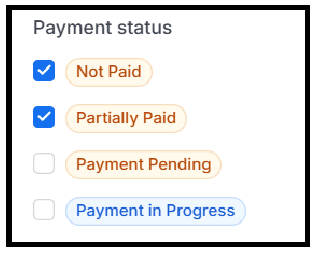
Vouchers with a Payment Pending or Payment in Progress status have been included in a prior payment batch. These vouchers are in approvals or released for processing.
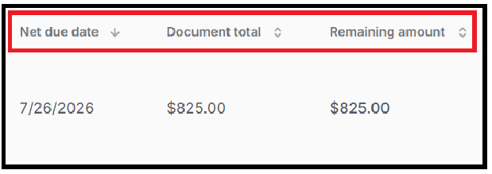
Vouchers can be sorted using the arrows to the right of each column:
Users can select the vouchers to be paid in a batch by checking the box to the left of each voucher: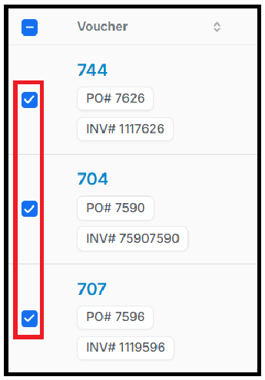
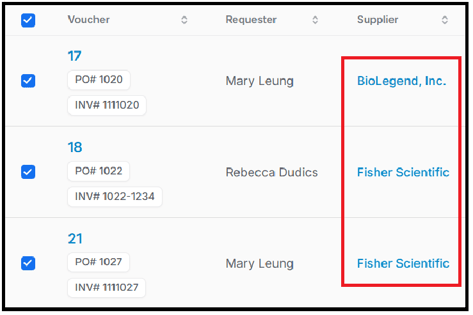
Vouchers from multiple suppliers can be selected for the same payment batch:
Note that payments must be batched based on the same currency. If a payment batch is created with conflicting currencies, a notification will appear preventing this batch from being created.
After selecting the vouchers to be included in the payment batch, select Prepare Batch via the ribbon on the bottom of the screen:
![]()
Other options listed in the ribbon include:
Request Bill Payments - If vouchers have been pushed to an ERP system and paid, users can select the vouchers in Unpaid Bills followed by Request Bill Payments. Prendio will detect that the vouchers have been paid and move the vouchers from Unpaid Bills to Paid Bills. Please note this option is available in case the voucher has been paid outside of Prendio and should not be available to create a payment batch.
Revert Selected Items - If a voucher requires adjustments, users can select the voucher(s) followed by Revert Selected Items. The voucher will move out of Unpaid Bills back to the AP Push (the voucher can be reverted in AP Push back to Vouchers > Accounts Payable as needed).
After Prepare Batch is selected, a pop-up modal will appear with the vouchers selected for the batch:
In the background, the payment batch will move from Unpaid Bills to the Batches tab:
Each payment batch will appear in a Draft status until approved and assigned a batch number:
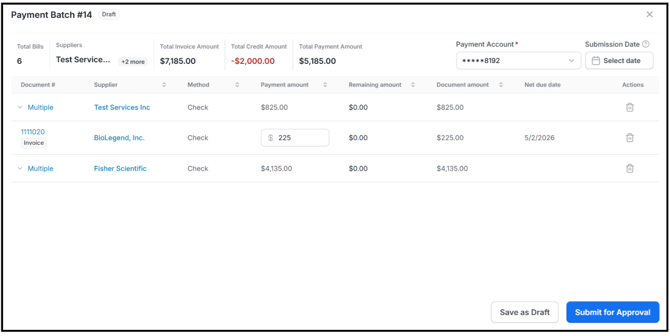
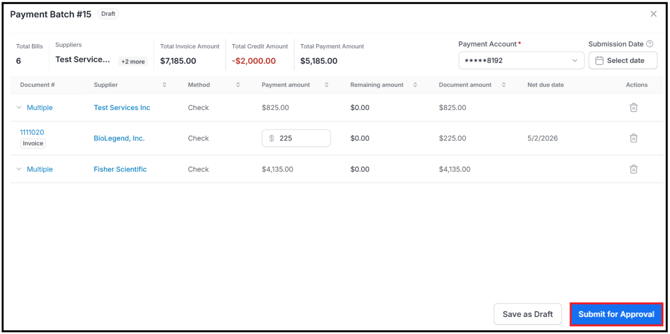
The top of the screen will also indicate the Total Bills, Suppliers, Total Invoice Amount (includes Tax & Freight), Total Credit Amount, and Total Payment Amount (nets out any Credits. Includes Tax & Freight) for the batch:

If Credit Memos are included in the batch, these will net out the payment amount.
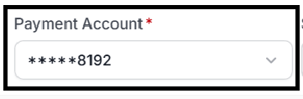
The Primary Bank Account will be defaulted for the payment batch; however, a different account can be selected using the dropdown:
If vouchers contain multiple suppliers, vouchers using the same supplier will be grouped together. The first line (Multiple) will indicate the total amount due to the supplier via Payment Amount:

Users can expand to see individual vouchers for a supplier by selecting the arrow to the left of Multiple. Subsequent lines will note each individual bill or credit via Document amount along with each voucher's Net due date (based on document date and Net terms):
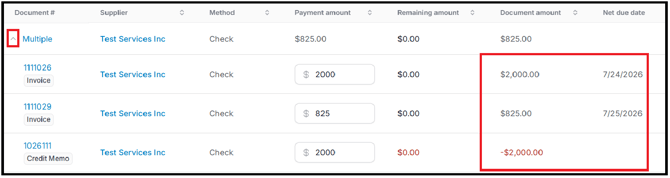
In the example above, there are three vouchers using the supplier, Testing Services Inc, totaling $825.00. Two invoices have a total of $2,825.00; however, the credit for $2,000.00 nets the total to $825.00.
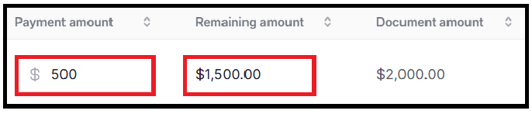
The Payment Amount will automatically default to the amount on the invoice via Document Amount (invoice including any tax or freight) in order the pay the voucher in full:
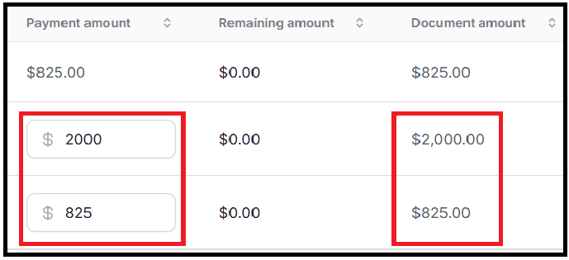
If users wish to make a partial payment on a voucher, the Payment Amount can be adjusted. The Remaining Amount will update and the status of the voucher will note that it is Partially Paid after the payment is fully processed:
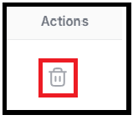
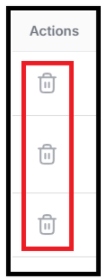
Vouchers can be removed from a payment batch using the delete option in the Actions column:
Payment batches can also be saved as Draft in case users need to come back to the payment at a later time:

Please note that any vouchers selected in Unpaid Bills for a payment batch will automatically save as draft until submitted for approval. The Save as Draft option allows users to make edits (partial payment, submission date, etc) and save these changes.
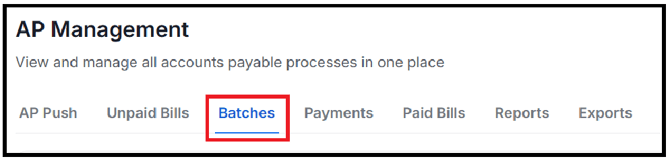
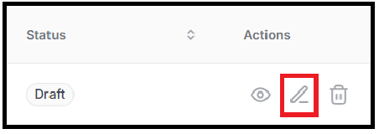
To locate a payment batch in Draft status, locate Batches:
Followed by the correct payment batch. Users can Edit the batch contents and submit for approval when ready:
Video Guidance on Selecting Vouchers to Create a Payment Batch
Scheduling a Payment Batch
Before submitting a batch for approval, users can opt to schedule payments in advance to fit a preferred schedule:
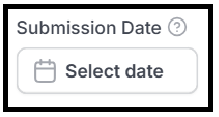
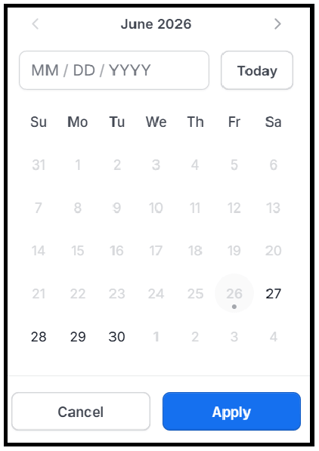
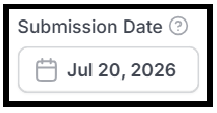
If a Submission Date is selected, Prendio will submit the batch on the later of the selected Submission Date, or the date the batch receives final approval or after confirming FX rates for international payments. Final approval can occur after the Submission Date depending on the approver(s) response time:
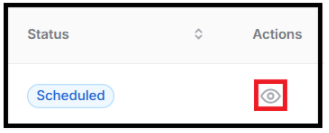
After a scheduled payment batch clears approvals, the batch can be found via Batches with a Scheduled status:
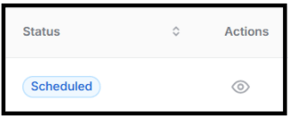
If the scheduled batch needs to be cancelled before the submission date, users can select View:
Followed by Cancel Batch in the Payment Batch window:

And confirm cancellation:
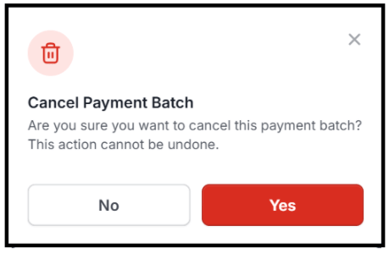
The batch will update to a Canceled status:
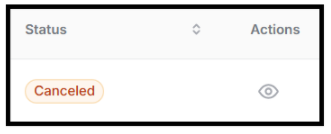
Vouchers in a canceled batch will return to Unpaid Bills.
Additional Notes to Consider:
-
When scheduling a payment batch, please account for the Hold for Funding period (up to 72 business hours), along with weekends and holidays.
- A Submission Date cannot be scheduled after the net due date for a voucher. This can affect a payment batch if multiple vouchers are selected and the Submission Date is beyond the due date of one or more vouchers.
-
FX rate shown at setup will likely change by scheduled Submission Date. Please exercise caution as even small changes in FX rate can be material for large payments. Prendio will not ask the user to re-confirm, and the batch will be submitted using the current FX rate on the Submission Date.
Video Guidance on Scheduling a Payment Batch
Submitting a Payment Batch for Approval
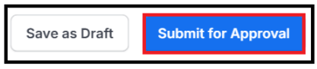
After the correct adjustments have been made to a payment batch, users can submit the batch for approval:
An approval window displaying all approvers required to review the payment batch will appear. Select Submit:
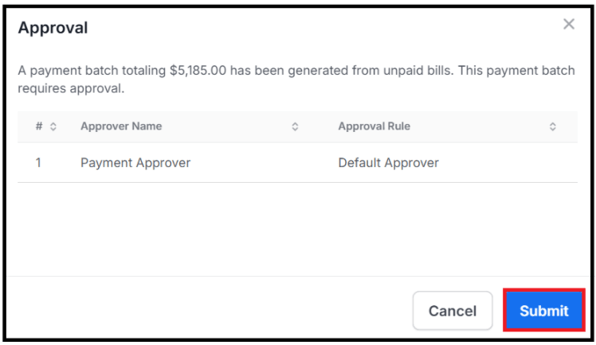
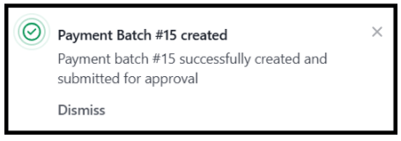
After submitting for approval, a message will appear at the top right of the screen indicating that the batch was successfully created and in approval for review:
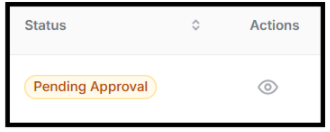
The status of the payment batch (located in Batches tab) will update to Pending Approval:
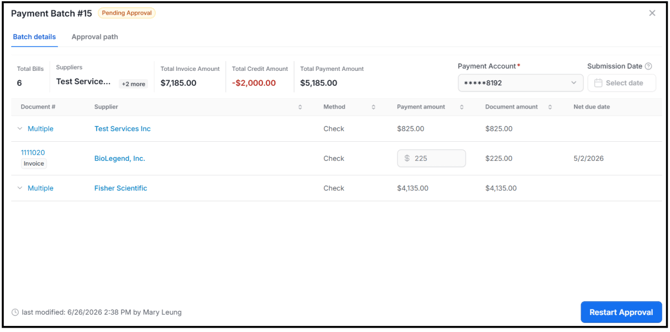
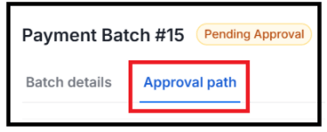
To track the approval of a payment batch, users can select View in the Actions column of the batch:

A pop-up modal will appear listing all of the vouchers contents submitted in the batch:
Users can select Approval Path to track the progress of approval:

If the approval for a payment batch needs to be restarted, users can select Restart Approval (Approvals may require a restart if changes have been made in Approval Settings or Approval Policy):
![]()
Responding to a Payment Batch Approval
Please note that any Payment Approvers also assigned the Payer role to submit payment batches cannot approve their own payment batches.
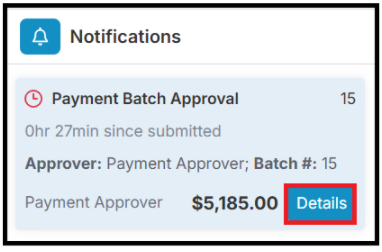
Approvers for a payment batch will receive a notification on their Dashboard via the Notifications section. Details can be selected to view the payment batch:
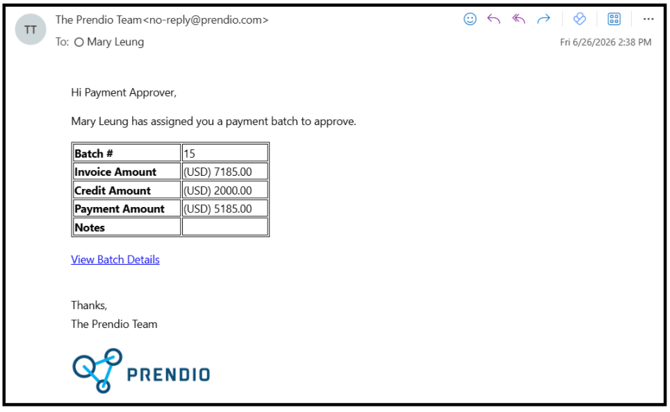
Users also receive a corresponding email:
When an Approver reviews a payment batch, details will be displayed:

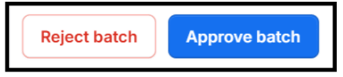
Approvers can decide if they Approve or Reject. Please note that Approvers cannot edit any of the payments or remove any bills from the payment batch:
If the payment batch is Rejected, users can resubmit after making the necessary adjustments.
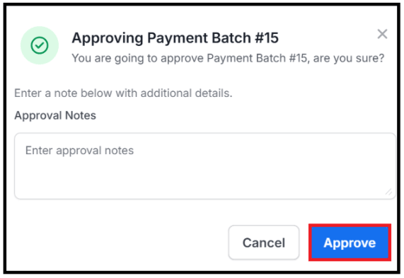
When an Approver selects Approve, a window will appear asking for Approval Notes (optional). Select Approve when complete:
*Additional approvers may be required depending on settings set in Approval Policy for custom rules.
After a payment batch clears approvals, the details moves to the payment partner where the batch will be processed and submitted to the supplier.
Confirming the FX Rates for International Payment Batches
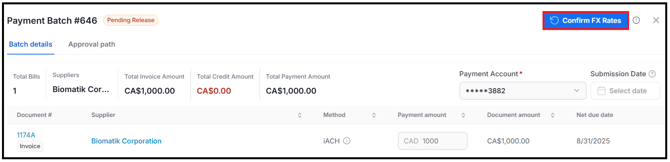
After clearing approvals, a user with the Payment Approver must confirm the exchange rate and release the batch for international payments in Batches.
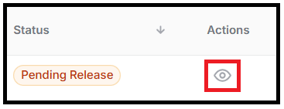
To release a batch, navigate to the Batches tab and locate the correct payment batch. The status will indicate that it is Pending Release. Select View in the Actions column for a separate window to appear to confirm the exchange rate:
In the Payment Batch, Select Confirm FX Rates:
![]()
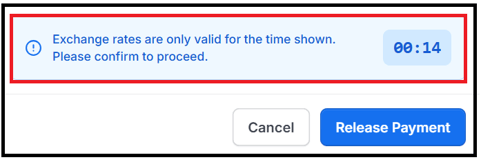
On the next window, review and confirm the exchange rate by selecting Release Payment:
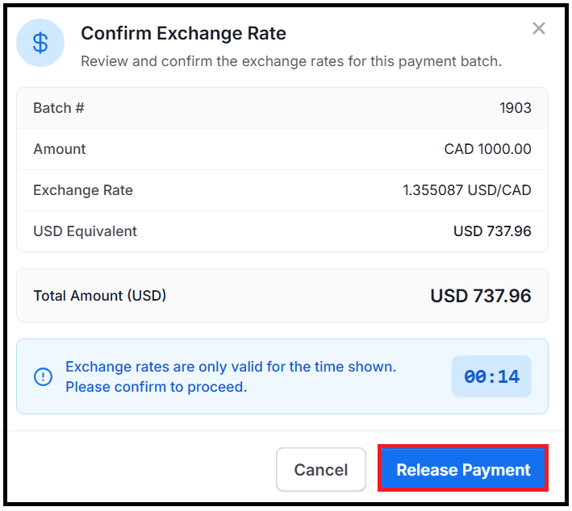
User have 15 seconds in this window to confirm the exchange rate via Release Payment. This will be reflected in the timer located on the bottom of the window:
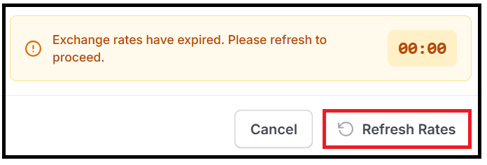
After 15 seconds, the timer expires; however, users can select Refresh Rates to update and restart the timer. Review any updates to the new rates before releasing the payment:
After the exchange rate is confirmed, the payment will proceed to process for funding to the supplier.
Rejecting a Payment Batch
If an Approver rejects a payment batch, a reason must be added before selecting Reject:

Video Guidance on Approving or Rejecting a Payment Batch
Video Guidance to Confirm the FX Rate for an International Payment
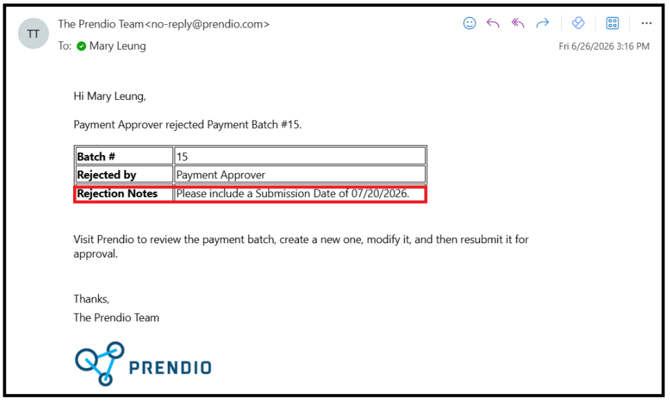
Responding to a Rejected Payment Batch
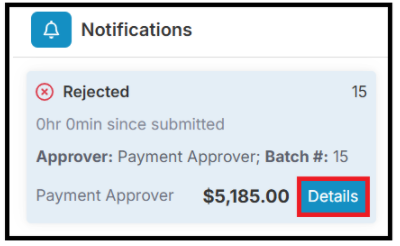
When a Payment Approver rejects a payment batch, a reason must be included before submitting. After a payment is rejected, the original payer of the payment will receive a notification on their Dashboard:
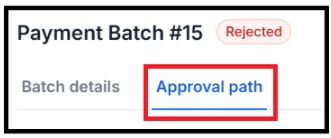
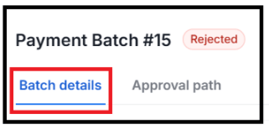
On the next screen, select Approval path to view rejection notes:

A corresponding email will also be sent to the original Payer:
The original payer can navigate to Batch Details to make changes before re-submitting for approval:
Updates to a batch before re-submitting for approval can include:
-
Payment Amount for a voucher
-
Submission Date
-
Payment Account
-
Deleting a voucher from the batch (voucher will return to Unpaid Bills)
After the correct changes have been made, users can re-submit for approval:
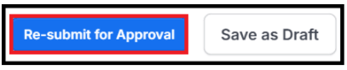
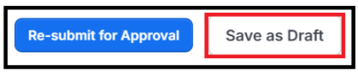
Users can also opt to Save as Draft to make changes at a later date:
If the entire payment batch must be deleted, users must select the Delete option via Actions for each voucher in the payment batch. Deleted vouchers will return to Unpaid Bills for a future batch to be created:
Video Guidance on Responding to a Rejected Payment Batch Approval
Funding From Payment Partner & Push to an ERP System
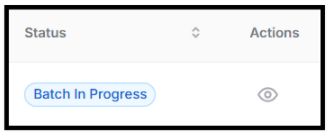
After a payment batch clears approvals, users can view the batch in Batches. The Status of the payment batch updates to Batch in Progress:
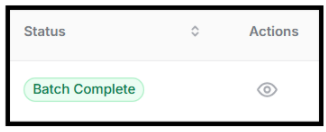
Funding for the payment batch will begin after clearing approvals. Funding to the vendor will be processed by the payment partner and once complete, the status will update to Batch Completed:
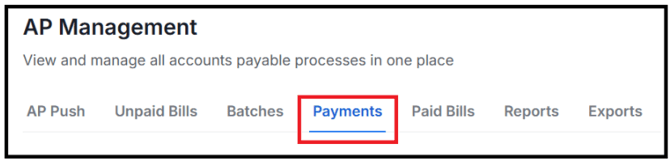
After clearing approvals, payment batches will also appear under the Payments tab:
Note the differences between Payment # vs. Batch #:
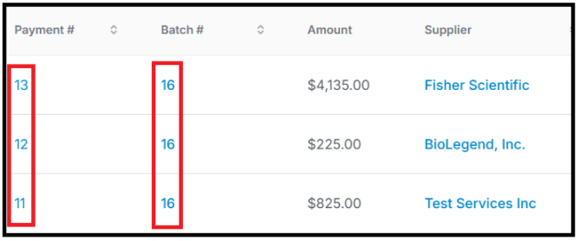
Batch # - When creating a payment batch in Unpaid Bills, users can select vouchers from multiple vendors using the same currency. These vouchers share the same Batch Number.
Payment # - After a payment batch clears approvals, vouchers from the batch will be assigned payment numbers separate from the batch number. Payment numbers will be separated by vendor. Vouchers from the batch sharing the same vendor will share one payment number.
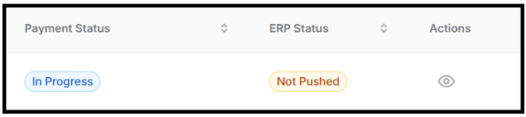
The Payment Status of each payment initially be In Progress. These have not yet been pushed to an ERP system yet and the ERP Status will note this as Not Pushed:
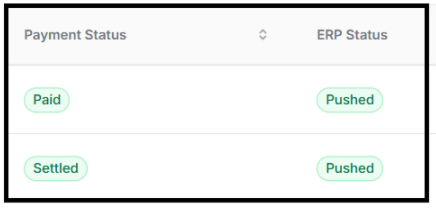
After reconciliation is complete, the Payment Status updates depending on the method of payment (Secure Card, ACH, iACH, SWIFT, or Check). The ERP Status will update to Pushed:
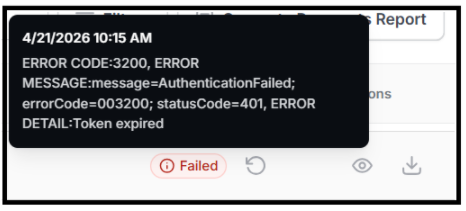
If the Payment Status is successful (green) but the ERP Status has Failed, users can attempt another Push by selecting the Refresh button:
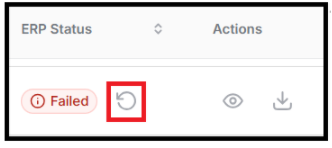
Users can also hover over the information icon to the left of a Failed status to view any error messages:
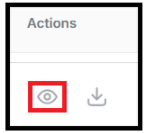
Users can track payment details by selecting View in the Actions column:
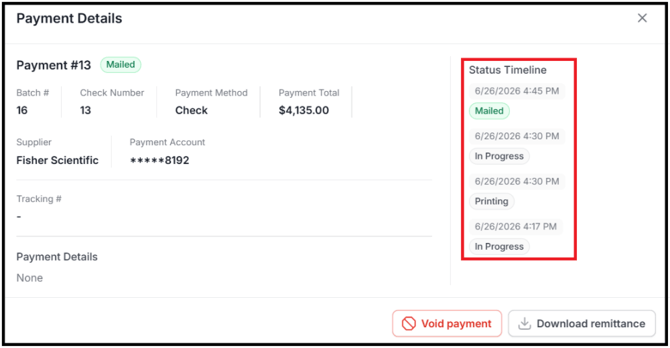
A Payment Details window appears allowing users to track the progress of a payment to a supplier via Status Timeline:
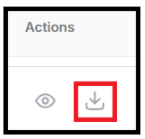
After a payment is complete and reconciled, the ability to download the remittance will be available in the Payment Details window:
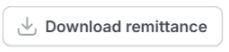
Users can also download a remittance to a supplier via the Actions column:
Payments pushed to an ERP system will appear as a Bill Payment with the Payment Number generated in Prendio to reference.
Below is an example of a payment in QuickBooks Online:
When viewing the details of a payment, invoices included in the payment batch will be selected:

Status Labels in Batches & Payments Tabs
Payment batches will periodically update status as it progresses through approvals and funding from the payment partner.
Batch Status Labels
After a batch has been created in Unpaid Bills, the selected vouchers are moved to Batches and submitted for approval:

Below is a table containing the batch status labels for domestic and international payments users will see as the payment batch progresses:
| Batch Status Label | Definition | Timing |
| Draft | Batch created, not yet submitted for approval |
User dependent |
| Pending Approval | Submitted by requester, awaiting approval from designated approver in Prendio |
User dependent |
| Approved | Approved by approver and ready for processing |
User dependent |
| Batch in Progress | Batch has begun processing within Prendio |
Same day or next business day post-approval |
| Funding Initiated | Payment funding has been requested from client account |
Same day or next business day post-approval |
| Funding Complete | Funds successfully debited / confirmed available for payment |
2 business days post funding pull |
| Payments Processing | Individual payments within batch are being processed |
Begins same day funding complete |
| Batch Complete | All payments processed, funded and sent to vendors |
Timing will vary |
Payments Status Labels
Once a payment batch clears approvals, each voucher will be released for funding to the vendor. Vouchers will be assigned separate payment numbers and appear in the Payments tab. Vouchers from the batch sharing the same vendor will share one payment number:

Domestic Payment Status Labels
| Check | Secure Card | ACH |
| In Progress Created, pending submission |
In Progress Created, pending card creation |
In Progress Created, pending ACH file to vendor bank |
| Printing Prepare check & envelope |
Sent Card created, pending vendor receipt |
Processing Payment file transmitted to vendor bank |
| Mailed Confirmed sent via USPS |
Paid Card accepted by vendor |
Paid Payment funded & sent |
| Reference bank account for settled check |
Settled Funds in vendor account |
Settled Payment reconciled and cleared |
International Payment Status Labels
| SWIFT Wire | iACH (International ACH / EFT) |
| In Progress Created, pending submission |
In Progress Created, pending submission |
| Processing Payment accepted, in process |
Settled Payment processed and acknowledged by receiving bank |
| Posting Payment acknowledged by SWIFT |
|
| Settled Payment completed to vendor |
Payments in Paid Bills Tab
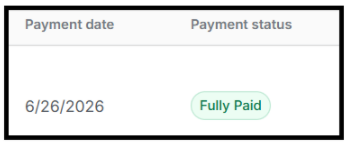
Prendio will detect that the vouchers are paid will move them to the Paid Bills tab:
The Payment Status column will reflect if a voucher is Fully Paid:
Other details for each payment will also be reflected. Please note that that in this view, the Requestor is the user that created and submitted the payment batch under the Payer role. The Payer in this view is the final approver of the payment under the Payment Approver role:

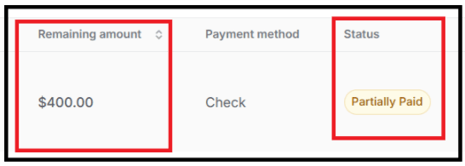
Partially Paid vouchers will not appear in the Paid Bills tab and will not appear in the Paid Bills report until Fully Paid.
These vouchers remain in Unpaid Bills with a Partially Paid status along with an updated Remaining Amount:

After Partially Paid invoices have been fully paid, these will leave the Unpaid Bills tab and appear in Paid Bills.