
Prendio Time Table is a lightweight feature for recording how much time people in your company have spent on specific projects. When enabled, Time Table appears in the lower portion of the user's Prendio Dashboard.
For information on how users submit their project time and receive Time Table reminders, see the Time Table help doc.
Notes:
- Time Table is a Prendio Add-On feature and might not be initially available for your company. For more information, contact Prendio Support by completing the Support Ticket Request Form
- At this time, there is no process for approving time before it is available for reporting
Topics
- Enable Time Table for Company
- Enable Time Table for Users
- Time Table Configuration for Projects
- Calendar Setup
- Editing Time as Admin
- Time Table Reporting
Enable Time Table for Company
The following must be completed to enable the Time Table feature for your Prendio company.
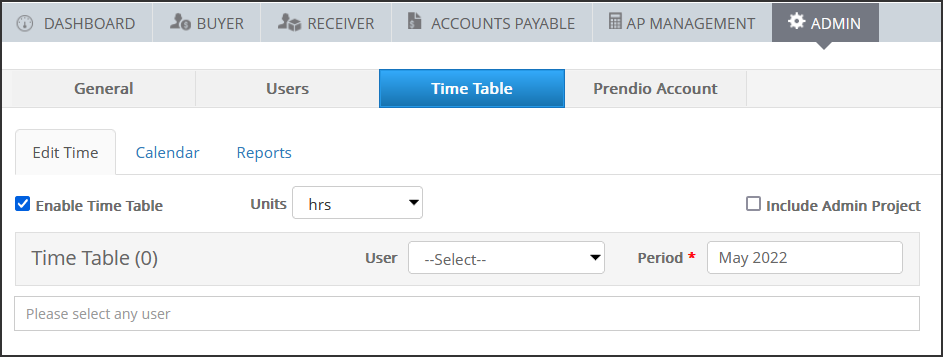
- As a user with the Admin role, go to [Admin > Time Table]. You will start on the default sub-tab Edit Time
- Click the Enable Time Table checkbox
- Select how your company wants to track project time in the Units field, by percentage (%) of a week or hours (Hrs) during a week
- For % of a week, users must account for their entire week (100%) before they can submit
- For tracking by hours, any total number of hours up to 100 can be submitted
- You have the option to Include Admin Project. This adds a special "Admin" project under [Accounts Payable > Projects > Prendio Projects]. That project can be uses for administrative time purposes such as vacation, sick-days, company events, etc.
Enable Time Table for Users
As a user with the Admin role, you can chose to enable access to Time Table on a user-by-user basis.
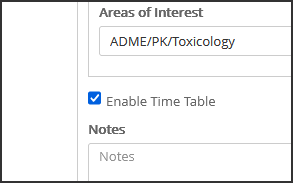
- Go to [Admin > Users]
- For any user being enabled, click the Edit button
- In the General section of the User Account Setup window, check the Enable Time Table option
- Click the Save button
Time Table Configuration for Projects
As user with the Accounts Payable Role, you can enable each Project for Time Table use and assign which users can submit time for it.
- Go to [Accounts Payable > Projects > Prendio Projects]
- For any project being enabled, click the Edit button
- In the General section of the Project Setup window, two related fields are available for selection:
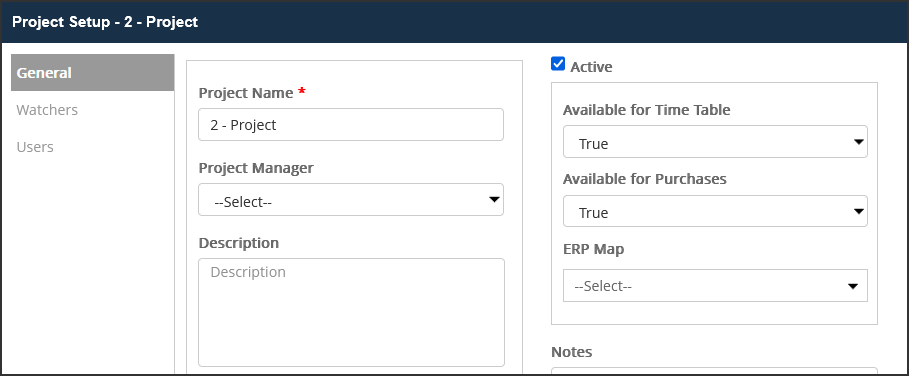
- Available for Time Table - Select "True" if this project will be available for users to select when entering time for Time Table
- Available for Purchases - If you select "False", the project will not be available for users to select when submitting Carts in Prendio. This setting is helpful if the project only exists for time tracking purposes, but not for purchasing or accounting purposes
Note - Project Manager is an optional field that can be set for reference purposes only. It is not used in any other areas of the Time Table feature at this time
- While remaining in the Project Setup window, go to the Users section
- You can check any user expected to submit time for the project under the Time Tracking column. This is similar to how you can check a user under the Member column so they can select the project in a Cart.
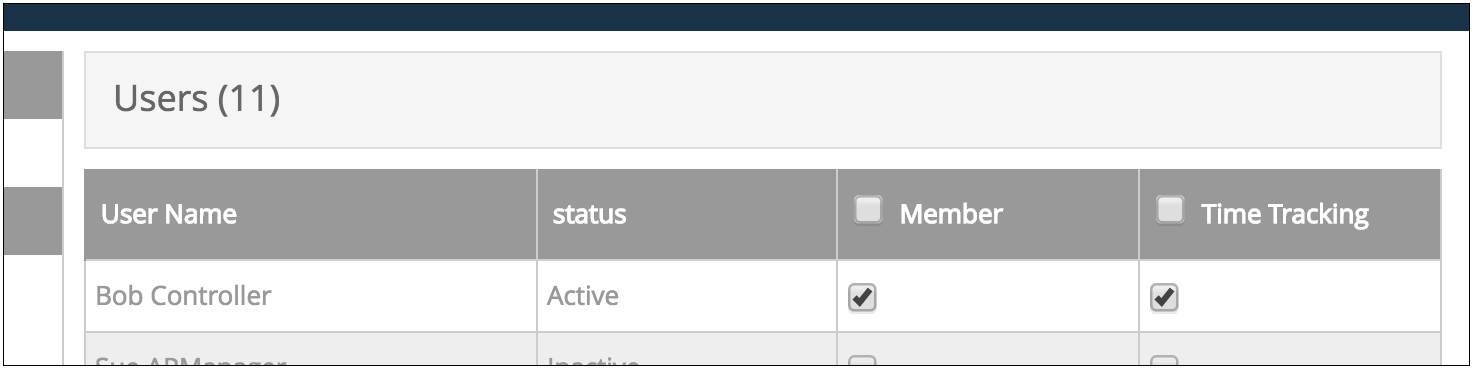
You have the flexibility to select either option for a user, depending on if you expect them to order for a project, submit time for a project, or both - When changes to the project are complete, click the Save button
Calendar Setup
Time is captured per week in Time Table. Each week appears in the user's Time Table, making it available for time entry. The weeks available for each year must be added to the Calendar by a user with the Admin role.
- Go to [Admin > Time Table > Calendar]
- Make a selection in the Select Year menu
- Click the Add Weeks button
- The weeks for the selected year are added to the calendar table
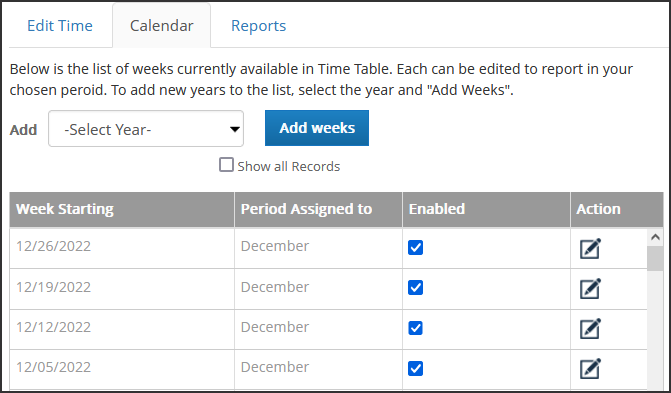
- Under the Enabled column, you can uncheck a week if there is no project time expected for it. No time can be submitted that week for any project in Time Table
- If you need to change the month to which a week is assigned, click the Edit button under the Action column for that week
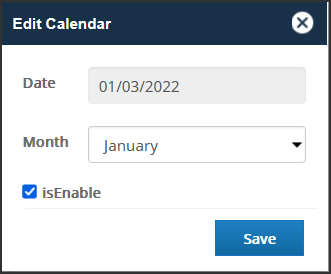
This is helpful if your company accounts for a week by a certain fiscal month or period. For example, if there are 5 weeks in a specific month you might choose to assign the first or last week to the prior or next month.
Note - Accounting periods edited after project time is entered will be reported under the original settings.
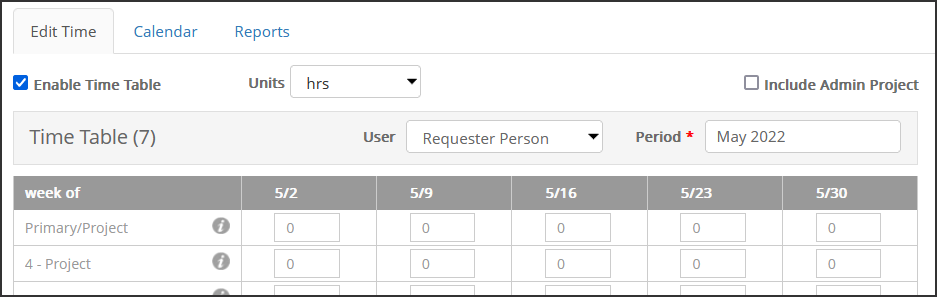
Editing Time as Admin
As a user with the Admin role, you can edit time records submitted by users. This is helpful if you need to make a quick correction or if users submitted the wrong time for weeks they can no longer edit.
- Go to [Admin > Time Table > Edit Time]
- Select the user in the Requester field
- Select the month and year in the Period field
- Project time for that user is available in the table
- You can change project times for any week. Changes save automatically and there is no Save button
Time Table Reporting
- As a user with the Admin role, go to [Admin > Time Table > Reports]
- Select a month and year, then click the Done button
- A report generates that includes users, their total entered project time, and entered project time for each project
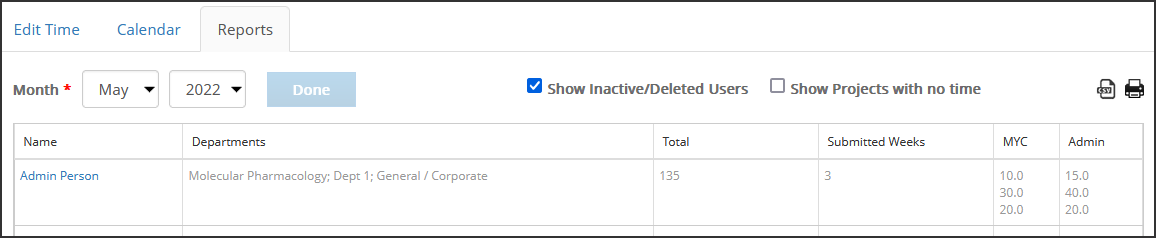
- Two filters can be unchecked to help manage the size of the table:
- Show Inactive/Deleted Users
- Show Projects with no time
- Click the CSV button to download a CSV file with the displayed report data
- Click the Print button see a printable version of the displayed report data