
Updated on June 20, 2025
New suppliers to Prendio can be used for an order. These suppliers must be Connected to the company. The supplier’s W-9, remittance address, and tax information must also be added to Prendio.
Identifying an Order Using a New Supplier
Connecting a Supplier - W-9 and Remittance Address in Prendio
Connecting a Supplier - No W-9 or Remittance Address in Prendio
Adding a New Supplier via The Suppliers Subtab
Account Numbers for a Supplier
Identifying an Order Using a New Supplier
New suppliers used for an order can be identified in the Requisition Queue as the order is highlighted in pink:

These orders will also appear in the Pending Suppliers section of the Buyers' Queue. Requisitions in approval using a new supplier will also appear in Pending Suppliers. After these orders are processed by a buyer, they are removed from the Requisition Queue and Pending Suppliers:

It is important to note that when using a new supplier, the supplier may require that your company create an account with payment terms before they are able to process the order. This may involve filling out a credit application and performing a credit check.
When ready to process an order, select Own in the Actions column:

Connecting a Supplier - W9 and Remittance Address in Prendio
After taking ownership of an order, the Supplier Detail window will appear for the new supplier:

Check to the right of the Supplier Detail window to see if the remittance address, remit email, and remit phone number has been added for the supplier:

Now check to see if the W-9 has been uploaded for the supplier:

After confirming that the supplier’s remittance address and W-9 are included in the Supplier Detail window, Connect the supplier to your company by checking off the Connected (Account Established) box:
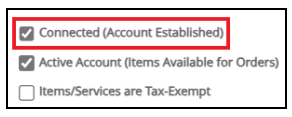
Active Account (Items Available for Orders) will automatically be selected. If this is not selected, check this as well:

When these boxes are checked, it ensures that the next time a user submits a requisition using the supplier will be connected. When these are unchecked, users submitting a cart using the supplier will see the supplier as new even though a previous order has been placed. If a New Supplier Approver is enabled at a company, the New Supplier Approver will be activated and need to review and approve the supplier again before the order can proceed.
Please note that if Active Account (Items Available for Orders) is unchecked, any vouchers associated with the supplier will prompt a Supplier not valid error in the AP Push of AP Management even after performing a Let's Align. This will prevent the voucher from being pushed to an ERP system until resolved:

If items and services are tax exempt, please also select Items/Services are Tax-Exempt:

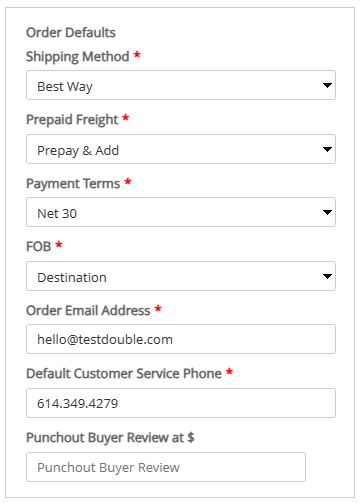
Complete the Order Defaults (these may be changed later if needed):
Once complete, Save on the bottom right:
![]()
After the Supplier Detail window is closed, the details of the PO will appear:

Please note that the Supplier Detail window must be completed before a PO can be generated. If a user exits out of the Supplier Detail window, the user will be unable to generate a PDF copy of the PO and areas are blank (example below):

Process the order based on Order Type. For more information regarding the Order Types, please visit:
New Suppliers with No Remittance Address or W-9
There may be times when a new supplier does not have a remittance address or W-9 in the Supplier Detail window:


The supplier above does not have a remittance address or W-9 uploaded. Before Connecting this supplier to your company, you must reach out to the supplier and obtain this information. Users can exit of the Supplier Detail window and navigate out of the PO page, by selecting Dashboard or Buyer until the supplier provides this information:
![]()
Once the remittance address and W-9 have been obtained, locate the PO in the My Reqs tab of the Buyer role:

Select View (eyeball) in the Actions column:

The Supplier Detail window for the PO appears. Add the remittance address to the Supplier Detail Window (Please note that the first line of the address is for the supplier's name):

Attach the W-9:

Complete the supplier's FID and Tax Classification (these fields can be found on the supplier's W-9):

After the W-9 is attached and the supplier's tax information is complete, mark the supplier as Connected (Account Established):
Active Account (Items Available for Orders) should already be checked. If this is not selected, check this as well:
When these boxes are checked, it ensures that the next time a user submits a requisition using the supplier will be connected. When these are unchecked, users submitting a cart using the supplier will see the supplier as new even though a previous order has been placed. If a New Supplier Approver is enabled at a company, the New Supplier Approver will be activated and need to review and approve the supplier again before the order can proceed.
Please note that if Active Account (Items Available for Orders) is unchecked, any vouchers associated with the supplier will prompt a Supplier not valid error in the AP Push of AP Management even after performing a Let's Align. This will prevent the voucher from being pushed to an ERP system until resolved:
If items and services are tax exempt, please also select Items/Services are Tax-Exempt:
Complete the Order Defaults (these may be changed later if needed):

Once complete, Save on the bottom right and exit out of the Supplier Detail window:
![]()
Once the Supplier Detail window is closed, the details of the PO will appear:
Please note that the Supplier Detail window must be completed before a PO can be generated. If a user exits out of the Supplier Detail window, the user will be unable to generate a PDF copy of the PO and areas are blank (example below):
Process the order based on Order Type. For more information regarding the Order Types, please visit:
Adding a New Supplier via The Suppliers Subtab
A new supplier may also be proactively added for your company via the Suppliers subtab:

If a company has a New Supplier Approver, they will be noted at the top of the table:

If the New Supplier Approver is out of office, their delegate will be listed in their place:
![]()
Please note that if a company has a New Supplier Approver, adding a supplier via the Suppliers tab will bypass any approval needed at the cart level. Before adding a new supplier in the Suppliers tab, please check internally with the New Supplier Approver to review any suppliers being added.
Select Add Supplier located at the top right of the table:

A Supplier Detail window appears. Search via the Supplier Name field to check and see if the supplier already exists in the Prendio database. If the supplier in the database, select the supplier:

After the correct supplier is selected, Confirm the supplier by selecting Yes:

Prendio will automatically Connect the supplier to your company. If this box is not selected, please connect the supplier to your company by checking off the Connected (Account Established) box:
Active Account (Items Available for Orders) should already be checked. If this is not selected, check this as well:
When these boxes are checked, it ensures that the next time a user submits a requisition using the supplier will be connected. When these are unchecked, users submitting a cart using the supplier will see the supplier as new even though a previous order has been placed. If a New Supplier Approver is enabled at a company, the New Supplier Approver will be activated and need to review and approve the supplier again before the order can proceed.
Please note that if Active Account (Items Available for Orders) is unchecked, any vouchers associated with the supplier will prompt a Supplier not valid error in the AP Push of AP Management even after performing a Let's Align. This will prevent the voucher from being pushed to an ERP system until resolved:
If items and services are tax exempt, please also select Items/Services are Tax-Exempt:
Check the fields on the right to confirm that a remittance address and W-9 has been added for the supplier:
Fill in the Order Defaults (these may be changed later if needed):
Once complete, Save on the bottom right and exit out of the Supplier Detail window:
![]()
The supplier will be added to the list of Connected Suppliers:
![]()
When a user creates a cart using the supplier, a checkmark with a circle will appear to the left of the supplier:

If a supplier is not found in the Prendio database by searching via the Supplier Name field, fill in the complete name for the supplier:

Please note that it is possible the supplier may be in the Prendio database under a different name.
The supplier does not have a remittance address or W-9 uploaded:
Before Connecting this supplier to your company, you must reach out to the supplier and obtain this information. Once the remittance address and W-9 have been obtained, add the remittance address to the right (Please note that the first line of the address is for the supplier's name):

Attach the W-9:

Complete the supplier's FID and Tax Classification (these fields can be found on the supplier's W-9):
After the W-9 is attached and the supplier's tax information is complete, mark the supplier as Connected (Account Established):
Active Account (Items Available for Orders) should already be checked. If this is not selected, check this as well :
When this these boxes are checked, it ensures that the next time a user submits a requisition using the supplier will be connected. When these are unchecked, users submitting a cart using the supplier will see the supplier as new even though a previous order has been placed. If a New Supplier Approver is enabled at a company, the New Supplier Approver will be activated and need to review and approve the supplier again before the order can proceed.
Please note that if Active Account (Items Available for Orders) is unchecked, any vouchers associated with the supplier will prompt a Supplier not valid error in the AP Push of AP Management even after performing a Let's Align. This will prevent the voucher from being pushed to an ERP system until resolved:
If items and services are tax exempt, please also select Items/Services are Tax-Exempt:
Complete the Order Defaults (these may be changed later if needed):
Once complete, Save on the bottom right and exit out of the Supplier Detail window:
![]()
The supplier will be added to the list of Connected Suppliers:
![]()
When a user creates a cart using the supplier, a checkmark with a circle will appear to the left of the supplier:
Account Numbers for a Supplier
If available, an Account Number can be added for the supplier to quickly reference the company's account on a PO.
Access the Supplier Detail Window after processing an order using a new supplier or by locating a supplier via Buyer > Suppliers tab > Edit

Locate Account Numbers on the left:

Select Add:
![]()
In the Add Account Numbers window, click on Select ship to address:

Select the Ship To Address, the account number is associated with.

After selecting the correct ship to address, add the Account number. Save when complete:

The newly added Account Number will display. Whenever a user creates a cart using the associated ship to address, the account number will appear on the PO sent to the supplier. Multiple account numbers can be added for different ship to addresses:
